Author
Penny at 2 Birds Boutique
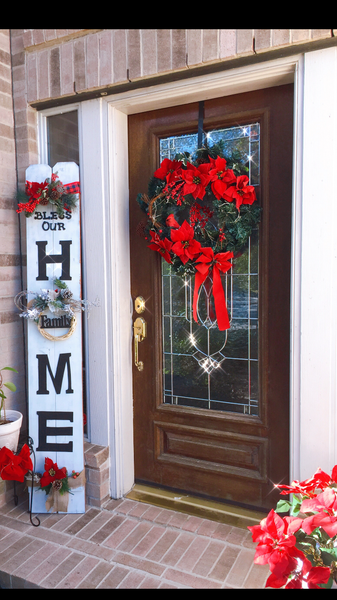
Want to know how I made this easy DIY porch sign?
There are so many different ways to do this. I’ll show you an inexpensive and easy way using only these items below.
This porch sign can be used for all seasons with a simple switch of the ribbons and different wreath for the letter “O”.
I know this blog has nothing to do with traveling or fashion, but I thought I’ve share something with you to keep your mind crafty during the quarantine.
Also, I got bored over the weekend (not that I’m not busy enough juggling a full time job, running an online store and also taking care of 2 loud kids); as silly as it may sound, working on a project is like meditation for me. Can anyone relate?
*this is not a sponsor link
What I Used:- 2 Dog Ear Fence Picket-pressure treated (I got mine from the Home Depot)
- 2 cut pieces of 11” wood
- 4 nails
- Any white paint will work
- 2 (12”x18”) black foam sheet
- Hot glue
- Optional - Small Wood Memoir Alphabet letters (From Michael’s)
- Craft paint brush
- Wreath (got mine from the dollar store)
- The word “family”
- Any ribbon of your choice (I’m making a Christmas theme for this one)
Step 1: Cut out your woods.
- Get your 2 pieces of wood cut to 11”. Home Depot will cut it for you for free. I founded mine in the wood scrap they were throwing out, so it was free.
Step 2: Prepare your woods.
- Lay your 2 Dog Ear Fence Picket side by side. You can sand yours down a bit to give e smooth finish when you apply your paint. The one I got was the cedar fence so I didn’t have to sand mine down.
- Next measure 58” between the bottom board to the top board. Then you lay your 11” wood pieces one for the top and anther at the bottom
- Nail the 11” wood piece down to your 2 Dog Ear Fence Picket
- Once you nail all your pieces; give your board a coat or two of white paint.
- Let it dry completely.
Step 3: Cutting and tracing your letters.
- While the paint is drying you can start working on the letters.
- I don’t have a Cricut printer so the letters were made using 2 (12”x18”) black foam sheet.
- First you want to print out the word “H” “M” “E” using your regular link printer. If you don’t have an ink printer, you can use your monitor to hand trace the word from your screen.
- Once you have the words “H” “M” “E” printed or trace, you want to trim the letters down so it’s easier to work with. Then line it up on your board to see what it looks like with spacing.
- If you are happy with the ways the letter looks and the size you want, you would then trace the letters to your 2 (12”x18”) black foam sheet. You can use a pen or pencil to trace down firmly that it transfers the letters to the foam sheet.


Step 5: Finishing Touch
- Add your Wreath and ribbons. You can change the Wreath and ribbons. I loved that it makes such a different ith the pop of colors it gives the front porch.


